Setting up PPTP VPN in Windows Server 2003

Basically, a VPN is a private network that uses a public network (usually the Internet) to connect remote users or sites together. VPN or Virtual Private network are low-cost and secure solutions that allow organizations to provide remote access to their network

Here are the steps in configuring VPN in Windows Server to any authentication method that you want.

Server Configuration:

1. Add Remote Access/VPN role to your server by going to
Start > All Programs> Administrative Tools> Configure Your Server Wizard.
First and second screen basically are for  informational purposes like telling to the things you need in completing of adding new roles in your server
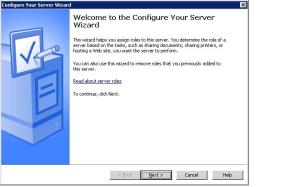
Configure your Server Wizard
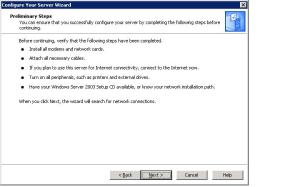
Configure your Server Wizard

Preliminary Steps

Preliminary Steps

2. Third screen is entitled “Server Role”, which will inform you on the list of server roles that you can in your server and will tell you if it’s configured or not. Sample diagram below:
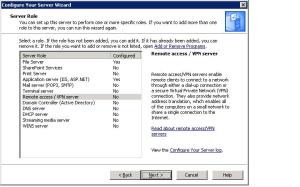
Server Role

Server Role

3. Select Remote Access/VPN server and then click Next
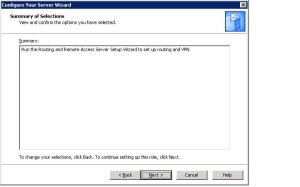
Summary of Selections
Summary of Selections

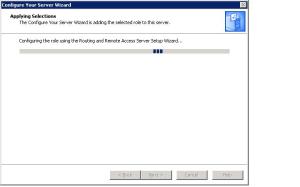
Applying Selections

Applying Selections

You will be prompt for Routing and Remote Access Wizard, just click Next.

4.  Select Virtual Private Network (VPN) access and NAT, then click Next.
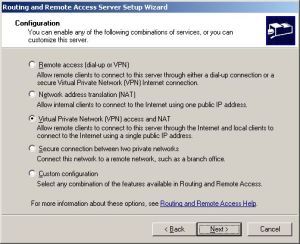
Routing and Remote Access Server Wizard

Routing and Remote Access Server Wizard

5. The next screen  entitled VPN Connection, asks you to determine which network adapter is used to connect the system to the Internet. For VPN servers, a separate network adapter should be installed and used. Put a checkbox on the “Enable security on the selected interface by setting up Basic Firewall” for added security.
Select outside NIC which is connecting to the Internet
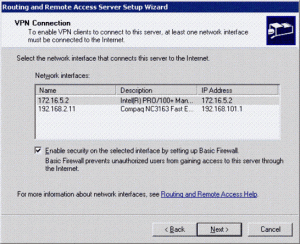
VPN Connection

VPN Connection

6. If you have more than one NIC, you will have a Network Selection option to select which network or NIC for the VPN client access. It will select what network your VPN client will access, which in this case is the private network. Click Next.

Network Selection

Network Selection

7. In the IP Address Assignment, you have two options, Automatically and From a specified range address. We keep the default, Automatically
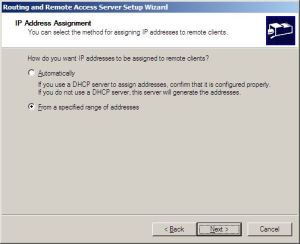
IP Address Assignment

IP Address Assignment

8.In Managing Multiple Remote Access, select No if you don’t have RADIUS.Click Next
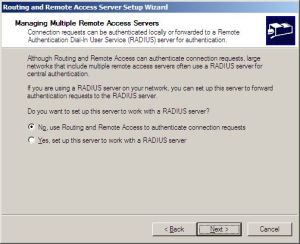
Managing Multiple Remote Access Servers

Managing Multiple Remote Access Servers

9.  A summary screen of the selects is the final screen after the wizard is finished.

Completing...

Completing...

User Configuration:

You need to create a VPN user in Active Directory (if you did not select Radius as your authentication method)
Open Active Directory Users and Computers (for domains). Open the properties page for a user to whom you’d like to grant access to the VPN. Select that user’s Dial-In properties page. On this page, under Remote Access Permissions, select “Allow access”

Sample Vista VPN client configuration:

a. Click Start > Connect to. Select Setup a Connection or Network
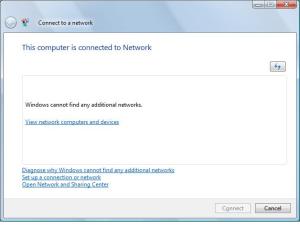
step 1

step 1

b. Select “Connect to a workplace”
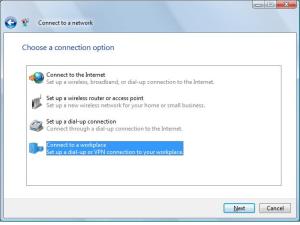
step 2

step 2

c. Select “Use my Internet connection (VPN)
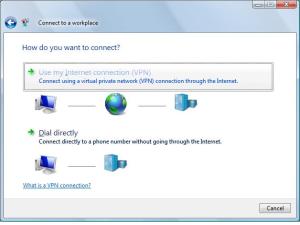
step 3

step 3

d. Type the internet address to connect  to. Input the public IP address of the VPN server
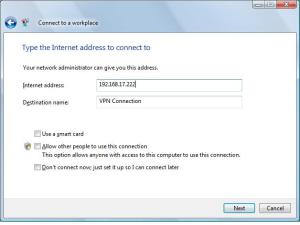
step 4

step 4

e. Input your VPN username/password
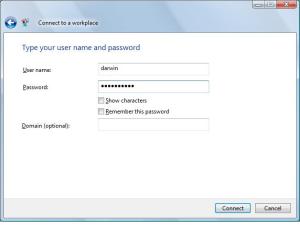
step 5

step 5

f. It will now start connecting to your VPN server
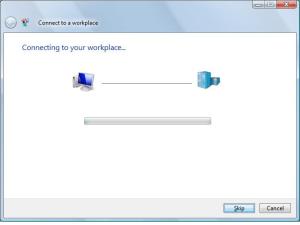
step 6
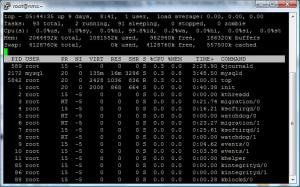
step 6

… continue reading this entry.

checking Linux CPU utilization

finding CPU utilization is one of the important tasks in systems administration. There are built-in and 3rd party tools that you can use to perform this task.

1. top – displays Linux tasks
this is the most common command used in getting CPU usage

#top

"the old good 'top' command"

"the old good 'top' command"

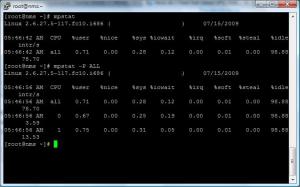
2. mpstat – display CPU individually and processors related stats.
In order to use this, package “sysstat” should be installed. you can use apt-get (debian-based) or yum (red-hat based) command to install it via internet

#yum install sysstat

#mpstat

#mpstat -P ALL

mpstat in action

mpstat in action

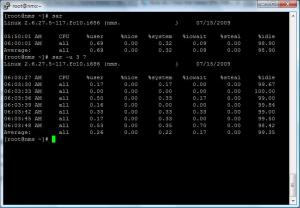
3. sar – Collect, report, or save system activity information.

#sar -u 3 7

sar in 3 secs interval & 7 times

sar in 3 secs interval & 7 times

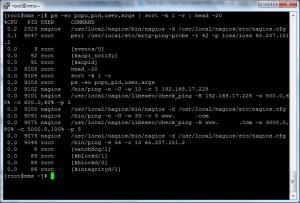
4. ps – report a snapshot of the current processes.

#ps -eo pcpu,pid,user,args | sort -k 1 -r | head -20

who's eating ur cpu?

who's eating ur cpu?

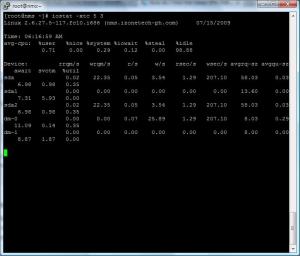
5. iostat – Report  Central  Processing  Unit  (CPU)  statistics and
input/output  statistics  for  devices,  partitions   and   network
filesystems (NFS).

#iostat
#iostat -xtc 5 3

iostat output every 5 secs

iostat output every 5 secs

happy checking 🙂

… continue reading this entry.

quick tip: mysql change/recover root password

Setting up mysql password is one of the essential task in systems administration

* mysql rulez!

* mysql rulez!

Note: Linux/Unix login root account for your operating system and MySQL root are different

You can use the built-in “mysqladmin” command to change MySQL root password. It can be executed anywhere as long the binary path is set on your Linux or Windows environment

Condition 1: If you have never set a root password for MySQL, the server does not require a password at all for connecting as root. To setup root password for first time, use mysqladmin command at shell prompt as follows:

$ mysqladmin -u root password NEWPASSWORD

Condition2 : However, if you want to change (or update) a root password, then you need to use following command

$ mysqladmin -u root -p’oldpassword’ password newpass

For example, If old password is xyz, and set new password to 654321, enter:

$ mysqladmin -u root -p’xyz’ password ‘654321’

Condition 3: Change MySQL password for other user

To change a normal user password you need to type (let us assume you would like to change password for darwin):

$ mysqladmin -u darwin -p oldpassword password newpass

Condition 4: Changing MySQL root user password using MySQL sql command

This is another method. MySQL stores username and passwords in user table inside MySQL database. You can directly update password using the following method to update or change password for user vivek:

1) Login to mysql server, type following command at shell prompt:

$ mysql -u root -p

2) Use mysql database (type command at mysql> prompt):

mysql> use mysql;

3) Change password for user darwin:

mysql> update user set password=PASSWORD(“NEWPASSWORD”) where User=’darwin’;

4) Reload privileges:

mysql> flush privileges;
mysql> quit

Condition 5: Recover MySQL root password

You can recover MySQL database server password with following five easy steps.

Step # 1: Stop the MySQL server process.
Step # 2: Start the MySQL (mysqld) server/daemon process with the –skip-grant-tables option so that it will not prompt for password
Step # 3: Connect to mysql server as the root user
Step # 4: Setup new root password
Step # 5: Exit and restart MySQL server

Here are commands you need to type for each step (login as the root user):

Step # 1 : Stop mysql service

# /etc/init.d/mysql stop

Output:

Stopping MySQL database server: mysqld.

Step # 2: Start to MySQL server w/o password:

# mysqld_safe –skip-grant-tables &
Output:

[1] 5988
Starting mysqld daemon with databases from /var/lib/mysql
mysqld_safe[6025]: started

Step # 3: Connect to mysql server using mysql client:

# mysql -u root

Output:

Welcome to the MySQL monitor. Commands end with ; or \g.
Your MySQL connection id is 1 to server version: 4.1.15-Debian_1-log

Type ‘help;’ or ‘\h’ for help. Type ‘\c’ to clear the buffer.

mysql>

Step # 4: Setup new MySQL root user password

mysql> use mysql;
mysql> update user set password=PASSWORD(“NEW-ROOT-PASSWORD”) where User=’root’;
mysql> flush privileges;
mysql> quit

Step # 5: Stop MySQL Server:

# /etc/init.d/mysql stop
Output:

Stopping MySQL database server: mysqld
STOPPING server from pid file /var/run/mysqld/mysqld.pid
mysqld_safe[6186]: ended

[1]+ Done mysqld_safe –skip-grant-tables

Step # 6: Start MySQL server and test it

# /etc/init.d/mysql start
# mysql -u root -p

* image above is copyrighted by MySQL AB /Sun Microsystems

windows keyboard shortcutz

This is just a repost coming from my archives back then since 2004, forgot where I get this. hope it still useful to some ^^

everybody loves shortcuts

everybody loves shortcuts

General Shortcuts

CTRL+C (Copy)
CTRL+X (Cut)
CTRL+V (Paste)
CTRL+Z (Undo)
DELETE (Delete)
SHIFT+DELETE (Delete the selected item permanently without placing the item in the Recycle Bin)
CTRL while dragging an item (Copy the selected item)
CTRL+SHIFT while dragging an item (Create a shortcut to the selected item)
F2 key (Rename the selected item)
CTRL+RIGHT ARROW (Move the insertion point to the beginning of the next word)
CTRL+LEFT ARROW (Move the insertion point to the beginning of the previous word)
CTRL+DOWN ARROW (Move the insertion point to the beginning of the next paragraph)
CTRL+UP ARROW (Move the insertion point to the beginning of the previous paragraph)
CTRL+SHIFT with any of the arrow keys (Highlight a block of text)
SHIFT with any of the arrow keys (Select more than one item in a window or on the desktop, or
select text in a document)
CTRL+A (Select all)
F3 key (Search for a file or a folder)
ALT+ENTER (View the properties for the selected item)
ALT+F4 (Close the active item, or quit the active program)
ALT+ENTER (Display the properties of the selected object)
ALT+SPACEBAR (Open the shortcut menu for the active window)
CTRL+F4 (Close the active document in programs that enable you to have multiple documents
open simultaneously)
ALT+TAB (Switch between the open items)
ALT+ESC (Cycle through items in the order that they had been opened)
F6 key (Cycle through the screen elements in a window or on the desktop)
F4 key (Display the Address bar list in My Computer or Windows Explorer)
SHIFT+F10 (Display the shortcut menu for the selected item)
ALT+SPACEBAR (Display the System menu for the active window)
CTRL+ESC (Display the Start menu)
ALT+Underlined letter in a menu name (Display the corresponding menu)
Underlined letter in a command name on an open menu (Perform the corresponding command)
F10 key (Activate the menu bar in the active program)
RIGHT ARROW (Open the next menu to the right, or open a submenu)
LEFT ARROW (Open the next menu to the left, or close a submenu)
F5 key (Update the active window)
BACKSPACE (View the folder one level up in My Computer or Windows Explorer)
ESC (Cancel the current task)
SHIFT when you insert a CD-ROM into the CD-ROM drive (Prevent the CD-ROM from automatically playing)

Dialog Box Keyboard Shortcuts

CTRL+TAB (Move forward through the tabs)
CTRL+SHIFT+TAB (Move backward through the tabs)
TAB (Move forward through the options)
SHIFT+TAB (Move backward through the options)
ALT+Underlined letter (Perform the corresponding command or select the corresponding option)
ENTER (Perform the command for the active option or button)
SPACEBAR (Select or clear the check box if the active option is a check box)
Arrow keys (Select a button if the active option is a group of option buttons)
F1 key (Display Help)
F4 key (Display the items in the active list)
BACKSPACE (Open a folder one level up if a folder is selected in the Save As or Open dialog box)

Microsoft Natural Keyboard Shortcuts

Windows Logo (Display or hide the Start menu)
Windows Logo+BREAK (Display the System Properties dialog box)
Windows Logo+D (Display the desktop)
Windows Logo+M (Minimize all of the windows)
Windows Logo+SHIFT+M (Restore the minimized windows)
Windows Logo+E (Open My Computer)
Windows Logo+F (Search for a file or a folder)
CTRL+Windows Logo+F (Search for computers)
Windows Logo+F1 (Display Windows Help)
Windows Logo+ L (Lock the keyboard)
Windows Logo+R (Open the Run dialog box)
Windows Logo+U (Open Utility Manager)

Accessibility Keyboard Shortcuts

Right SHIFT for eight seconds (Switch FilterKeys either on or off)
Left ALT+left SHIFT+PRINT SCREEN (Switch High Contrast either on or off)
Left ALT+left SHIFT+NUM LOCK (Switch the MouseKeys either on or off)
SHIFT five times (Switch the StickyKeys either on or off)
NUM LOCK for five seconds (Switch the ToggleKeys either on or off)
Windows Logo +U (Open Utility Manager)

Windows Explorer Keyboard Shortcuts

END (Display the bottom of the active window)
HOME (Display the top of the active window)
NUM LOCK+Asterisk sign (*) (Display all of the subfolders that are under the selected folder)
NUM LOCK+Plus sign (+) (Display the contents of the selected folder)
NUM LOCK+Minus sign (-) (Collapse the selected folder)
LEFT ARROW (Collapse the current selection if it is expanded, or select the parent folder)
RIGHT ARROW (Display the current selection if it is collapsed, or select the first subfolder)

Shortcut Keys for Character Map
After you double-click a character on the grid of characters, you can move through the grid by
using the keyboard shortcuts:

RIGHT ARROW (Move to the right or to the beginning of the next line)
LEFT ARROW (Move to the left or to the end of the previous line)
UP ARROW (Move up one row)
DOWN ARROW (Move down one row)
PAGE UP (Move up one screen at a time)
PAGE DOWN (Move down one screen at a time)
HOME (Move to the beginning of the line)
END (Move to the end of the line)
CTRL+HOME (Move to the first character)
CTRL+END (Move to the last character)
SPACEBAR (Switch between Enlarged and Nor mal mode when a character is selected)

Microsoft Management Console (MMC) Main Window Keyboard Shortcuts

CTRL+O (Open a saved console)
CTRL+N (Open a new console)
CTRL+S (Save the open console)
CTRL+M (Add or remove a console item)
CTRL+W (Open a new window)
F5 key (Update the content of all console windows)
ALT+SPACEBAR (Display the MMC window menu)
ALT+F4 (Close the console)
ALT+A (Display the Action menu)
ALT+V (Display the View menu)
ALT+F (Display the File menu)
ALT+O (Display the Favorites menu)

MMC Console Window Keyboard Shortcuts

CTRL+P (Print the current page or active pane)
ALT+Minus sign (-) (Display the window menu for the active console window)
SHIFT+F10 (Display the Action shortcut menu for the selected item)
F1 key (Open the Help topic, if any, for the selected item)
F5 key (Update the content of all console windows)
CTRL+F10 (Maximize the active console window)
CTRL+F5 (Restore the active console window)
ALT+ENTER (Display the Properties dialog box, if any, for the selected item)
F2 key (Rename the selected item)
CTRL+F4 (Close the active console window. When a console has only one console window,
this shortcut closes the console)

Remote Desktop Connection Navigation

CTRL+ALT+END (Open the m*cro$oft Windows NT Security dialog box)
ALT+PAGE UP (Switch between programs from left to right)
ALT+PAGE DOWN (Switch between programs from right to left)
ALT+INSERT (Cycle through the programs in most recently used order)
ALT+HOME (Display the Start menu)
CTRL+ALT+BREAK (Switch the client computer between a window and a full screen)
ALT+DELETE (Display the Windows menu)
CTRL+ALT+Minus sign (-) (Place a snapshot of the active window in the client on the
Terminal server clipboard and provide the same functionality as pressing PRINT SCREEN on a local computer.)
CTRL+ALT+Plus sign (+) (Place a snapshot of the entire client window area on the Terminal server
clipboard and provide the same functionality as pressing ALT+PRINT SCREEN on a local computer.)

Internet Explorer navigation

CTRL+B (Open the Organize Favorites dialog box)
CTRL+E (Open the Search bar)
CTRL+F (Start the Find utility)
CTRL+H (Open the History bar)
CTRL+I (Open the Favorites bar)
CTRL+L (Open the Open dialog box)
CTRL+N (Start another instance of the browser with the same Web address)
CTRL+O (Open the Open dialog box, the same as CTRL+L)
CTRL+P (Open the Print dialog box)
CTRL+R (Update the current Web page)
CTRL+W (Close the current window)

quick tip: how to check if perl module is present?

A. Checking if Perl Module is Installed

This is important on checking if a given perl module is already installed or not.

Code:

#perl -MModule::Name -e 1

example:
#

if present, no errors appeared:
[root@darwin ~]# perl -MNet::SNMP -e 1

without:

[root@darwin ~]# perl -MNet::Telnet -e 1

Can’t locate Net/Telnet.pm in @INC (@INC contains: /usr/lib/perl5/5.10.0/i386-linux-thread-multi /usr/lib/perl5/5.10.0 /usr/local/lib/perl5/site_perl/5.10.0/i386-linux-thread-multi /usr/local/lib/perl5/site_perl/5.10.0 /usr/lib/perl5/vendor_perl/5.10.0/i386-linux-thread-multi /usr/lib/perl5/vendor_perl/5.10.0 /usr/lib/perl5/vendor_perl /usr/local/lib/perl5/site_perl/5.10.0/i386-linux-thread-multi /usr/local/lib/perl5/site_perl/5.10.0 /usr/local/lib/perl5/site_perl /usr/lib/perl5/site_perl .).
BEGIN failed–compilation aborted.

B. Check if the documentation of a perl module is installed.
Code:
perldoc Module::Name
e.g.

# perldoc Net::SNMP

Net::SNMP(3) User Contributed Perl Documentation Net::SNMP(3)
NAME
Net::SNMP – Object oriented interface to SNMP

without:

[root@darwin ~]# perldoc Net::Telnet

No documentation found for “Net::Telnet”.

INSTALLING PERL MODULES

1. via CPAN

(+) Open CPAN shell:

# perl -MCPAN -e shell

(+) To reconfigure the shell if needed.

cpan>o conf init

(+) Install an available module.

cpan> install Module::Name

# Force install if test fails.

cpan> force install Module::Name

2. Manual
Search and download the file in http://search.cpan.org
e.g. Time::HiRes

searching in cpan

searching in cpan

#wget http://search.cpan.org/CPAN/authors/id/J/JH/JHI/Time-HiRes-1.9719.tar.gz
#tar zxvf Time-HiRes-1.9719.tar.gz
# perl Makefile.PL
# make
# make test
# make install

setting up ftp via vsftpd in linux

The VSFTPD (Very Secure FTP Server Deamon) is one of the most commonly used FTP servers under Linux and comes with most Linux distributions.

This article will help you install and configure vsftpd in Linux. (sample OS used is a Red-hat based distribution)

GOALS:

* to create a secure ftp server
* to create an ftp user chrooted or jailed in a certain directory (sample use is an apache directory wherein you can limit users or your developers to just upload to a restricted folder)

procedures and actual simulation as follows:

A. INSTALLATION

#yum install vsftpd

Loaded plugins: refresh-packagekit
updates                                                  | 3.4 kB     00:00
updates/primary_db                                       | 4.0 MB     00:10
fedora                                                   | 2.8 kB     00:00
Setting up Install Process
Parsing package install arguments
Resolving Dependencies
–> Running transaction check
—> Package vsftpd.i386 0:2.0.7-2.fc10 set to be updated
updates/filelists_db                                                                                   | 7.3 MB     00:18
fedora/filelists_db                                                                                    |  11 MB     00:24
–> Finished Dependency Resolution
Dependencies Resolved
======================================================================================================
Package                     Arch                      Version                             Repository                    Size
======================================================================================================
Installing:
vsftpd                      i386                      2.0.7-2.fc10                        updates                      145 k

Transaction Summary
======================================================================================================
Install      1 Package(s)
Update       0 Package(s)
Remove       0 Package(s)

Total download size: 145 k
Is this ok [y/N]:y

Downloading Packages:
vsftpd-2.0.7-2.fc10.i386.rpm                                                                              | 145 kB     00:00
Running rpm_check_debug
Running Transaction Test
Finished Transaction Test
Transaction Test Succeeded
Running Transaction
Installing     : vsftpd                                                                                                    1/1
Installed:
vsftpd.i386 0:2.0.7-2.fc10
Complete!

B. Edit configuration file (self-explanatory)

# vi /etc/vsftpd/vsftpd.conf

Here’s the important line that you need to modify:

# Turn off anonymous users
anonymous_enable=NO

# Turn on local users
local_enable=YES

# Users should be able to write
write_enable=YES

# chroot everyone
chroot_local_user=YES

#create userlist
userlist_file=/etc/vsftpd/vsftpd.userlist

C.  Create ftp acct (example create ftp user darwin)

# useradd -d /home/Sites/ -s /sbin/nologin darwin
# passwd darwin

D.    Add it on the vsftpd service userlist

# vi /etc/vsftpd/vsftpd.userlist

Add the ftp name pmorris, This will be the output once included:

# cat /etc/vsftpd/vsftpd.userlist
darwin

E. Add an FTP group e.g. ftpusers

#groupadd ftpusers

Example directory where we will jail the ftp users: /home/Sites

F. Change the ownership of the directory. e.g. root: ftpusers

/home/Sites folder ownership is currently set to root:ftpusers with permission 775 (meaning all FTP users should be in the GROUP “ftpusers”, and it has a GROUP read-write-execute) permission
drwxrwxr-x 13 root      ftpusers   4096 Jan 28 15:23 Sites

G. Add the ftpuser in the ftpusers group

#vi /etc/group

This will be the output once included:
ftpusers:x:502:darwin

Alternatively: you can use the command

#usermod -G ftpusers darwin

Testing:
Using your favorite FTP client such as FileZilla FTP or via CLI , you can test the functionality by uploading, deleting or creating folders on it.

————————————————————————————————————————
[root@darwin ~]# ftp ip.of.the.server
Connected to ip.of.the.server (ip.of.the.server).
220 (vsFTPd 2.0.5)
Name (ip.of.the.server:root): darwin
331 Please specify the password.
Password:
230 Login successful.
Remote system type is UNIX.
Using binary mode to transfer files.
ftp> bin
200 Switching to Binary mode.
ftp> bye
221 Goodbye.

how to run windows in linux via qemu?

There are lots of operating system virtualization, you have the option to use an open source or a proprietary software depending on your needs,familiarization and most significantly, budget. People have several reasons why they use virtualization, and the most common is for testing purposes wherein they can test different configurations from different OS. Another reason is to security and consolidation, where they can save money and electricity.

Some of the popular open source linux virtualization softwares are OpenVZ, Xen, KVM and VirtualBox. You can also try proprietary softwares such as VMWare and Citrix XenServer, a commercial implementation of Xen.

For this tutorial, I’ll be covering Qemu, another virtualization program and here are the steps:

Prerequisites and componets:

a. windows installation in ISO format  ex. WinXP ( you can create ISO format using 3rd party programs like magic ISO, power ISO etc.)

b.process emulator (QEMU)

c. any Linux distribution (I’ll be using CentOS 5 for this demonstration)

d. Linux/Unix administration skills

A. Installing qemu

# yum install qemu

# qemu-img create winxp.img 4G

C. install the windows

#qemu -hda winxp.img -cdrom win.iso -m 256 -boot d

B. Create windows image by creating a virtual drive ( sample demo is creation of 4 GB virtual drive named winxp.img)

this will tell qemu to use the virtual disk as the hard disk, which drive to use as the cdrom  and to allocate 256 memory for the virtual pc
Qemu will boot up and you will be in windows install (line the normal windows installation)

Tips: CTRL+ALT= when you need your mouse
ALT+CTRL+F = toggle fullscreen

This is a sample screenshot:

qemu

qemu

After finished the windows installation, you can just close the Qemu Window

D. Testing the newly installed windows under Linux

#qemu -hda winxp.img -m 256 -boot c

NOTE: This procedure is being done in your Linux X environment e.g. GNOME , KDE etc.

CHALLENGE: How to emulate Windows in Linux OS when you only have ssh access to the remote server, no X or GUI?

SOLUTION: Create a windows image in your local test machine then upload the image file.
Tip: Since an image file will be 4GB in size, you can split the file into several pieces via your favorite archiver. I used Winrar for this one, then upload those files in queue ( Bandwidth matters)

* Since image is already uploaded on the server, the only thing to do is to emulate and redir port 3389 for RDP purposes.

sample:

# qemu -hda /home/test/winxp.img -m 2000 -boot c -redir tcp:3389::3389 -nographic

You can now access your windows via RDP… Start> Run..> mstsc

then input the server IP address

enjoy! 🙂

intro to techie share

As the saying goes “There is no delight in owning anything unshared”, I made this blog to share what I have learned for past years working in IT industry. I’ll share some tips, tutorials,documentation and personal experience working with several system platforms, network devices and gadgets.

-darwin h (ece,ccna)

“Share everything. Don’t take things that aren’t yours. Put things back where you found them.”